How to Build a Gaming PC for Beginners: Step-by-Step Guide 2026
Building a gaming PC looks intimidating only until you reduce it to a sequence of small, checkable jobs. You are not soldering a motherboard or programming firmware; you are matching compatible parts, seating them correctly, connecting clearly labeled cables, and verifying the system one stage at a time.
This guide explains how to build a gaming pc for beginners without assuming you already know what a DIMM slot, EPS cable, M.2 standoff, or front-panel header is. You will learn how to choose compatible hardware, assemble it safely, get the first boot, install Windows and drivers, troubleshoot common failures, and set up the machine so it stays cool and dependable.
What Is the Easiest Way to Build a Gaming PC?
To build a gaming PC, choose compatible parts, install the CPU, RAM and M.2 SSD on the motherboard, mount the board in the case, install the power supply and graphics card, connect all power and front-panel cables, boot into BIOS, install Windows and drivers, then test temperatures and stability.
A first build is usually a two-to-four-hour project if the parts are compatible and you work methodically. The most important beginner skill is not speed. It is stopping before forcing anything and checking the motherboard manual whenever a connector or slot is unclear.
Essential Tools & Materials Breakdown
You need fewer tools than most first-time builders expect. A magnetic-tip #2 Phillips screwdriver handles the majority of screws, while the component boxes and motherboard manual do most of the organizational work.
The hardware budget below is a planning range in U.S. dollars, not a live quote. Prices can swing heavily by country, GPU class, sales, taxes, memory capacity, and whether you buy new or used parts.
| Item | Why You Need It | Typical 2026 Planning Range | Beginner Skill | What to Check Before Buying |
| CPU | Runs game logic, background tasks and general computing | $120-$450 | Easy to install, delicate to handle | Motherboard socket, BIOS support, cooler needs |
| Graphics card (GPU) | Renders games and usually determines most gaming performance | $250-$900+ | Moderate | Case clearance, PSU wattage, power connector type |
| Motherboard | Connects every major component | $100-$300 | Moderate | CPU socket, RAM type, form factor, M.2 slots, Wi-Fi needs |
| RAM | Active working memory for games and apps | $60-$180 | Easy | DDR generation, kit capacity, supported speed |
| M.2 NVMe SSD | Fast storage for Windows and games | $50-$180 | Easy | M.2 slot compatibility, capacity, heatsink clearance |
| Power supply (PSU) | Converts wall power and feeds all components | $70-$180+ | Moderate cable work | Wattage headroom, quality, form factor, GPU connectors |
| PC case | Holds parts and controls airflow | $60-$180 | Easy | GPU length, cooler height, motherboard size, fan support |
| CPU cooler | Removes heat from the processor | $30-$160 | Moderate | Socket support, case height/radiator support, RAM clearance |
| Case fans | Move cool air in and warm air out | $10-$30 each | Easy | Size, header count, airflow direction, PWM support |
| #2 Phillips screwdriver | Handles most PC screws | $8-$20 | Easy | Magnetic tip is helpful |
| Anti-static precautions | Reduces the risk from electrostatic discharge | $0-$15 | Easy | Work on a hard surface; avoid carpet and loose static-prone clothing |
| USB flash drive | Creates the Windows installer | $8-$20 | Easy | 8 GB minimum is common; use a spare drive because setup may erase it |
💡 Quick Hack: Spend your budget where it changes your games. For most gaming-focused builds, a sensible GPU plus a capable midrange CPU produces a better experience than an expensive CPU paired with a weak graphics card.
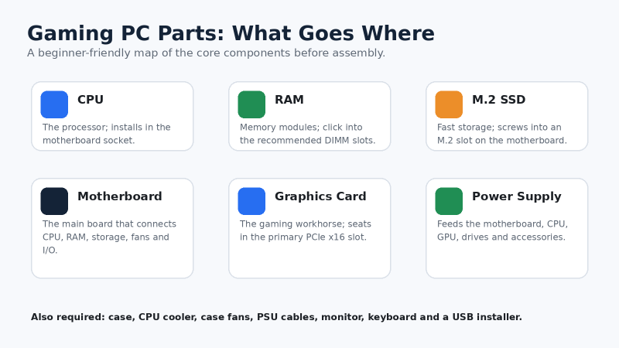
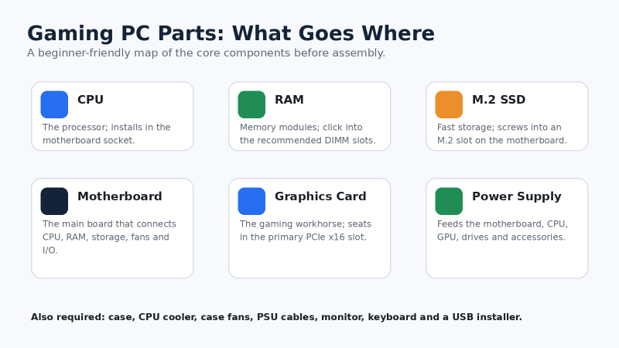
Figure 2. Identify the core parts and their roles before assembly. Before assembly, identify each major component and confirm which motherboard slot or power connector it uses.
Decide What the PC Must Actually Do
The smartest way to approach how to build a gaming pc for beginners is to start with the monitor and games, not a list of flashy components. A PC aimed at 1080p esports at high frame rates has different priorities from a 4K machine for visually demanding single-player games.
Write down four targets before shopping:
- Resolution: 1080p, 1440p or 4K.
- Frame-rate goal: 60, 120, 144, 165, 240 FPS or higher.
- Game type: esports, simulation, open-world AAA, strategy, VR or a mix.
- Non-gaming workloads: streaming, video editing, coding, 3D work or school tasks.
The GPU should usually receive the largest share of a gaming budget because resolution and image quality depend heavily on it. CPU performance matters more when you target very high frame rates, play CPU-heavy simulation titles, stream, compile code, or perform productivity work alongside gaming.
Pro-Tip: Set a hard total budget that includes the monitor, Windows license if needed, keyboard, mouse, headset and Wi-Fi adapter if the motherboard lacks wireless networking. A “$1,000 PC” easily becomes a $1,300 setup when those extras appear late.
Confirm Every Part Is Compatible Before Ordering
Compatibility is where most expensive beginner mistakes happen. A reliable approach to how to build a gaming pc for beginners is to treat compatibility as a checklist, because a component can be excellent on its own and still be wrong for your system.
Match the CPU to the motherboard
The processor must match the motherboard’s socket and be supported by its BIOS. Do not assume every board using a physically compatible socket supports every processor automatically; older stock can sometimes ship with firmware that predates a newer CPU.
Check the motherboard manufacturer’s CPU support list when there is any doubt. If a BIOS update may be required, a board with a BIOS flashback feature can be extremely helpful because many models can update firmware without a working CPU installed.
Match the RAM generation and capacity
DDR4 and DDR5 are not interchangeable. Buy a matched memory kit rather than mixing separate modules, and use the motherboard manual to identify the preferred two-stick slots—commonly the second and fourth slots from the CPU, but the manual is the authority.
For a new gaming build, capacity matters more than chasing extreme memory clocks. Choose enough memory for your actual games and multitasking, then use a validated speed that your CPU and motherboard can handle reliably.
Check the case dimensions
Confirm these three clearances:
GPU length and thickness: modern cards can occupy three or more slots.
CPU cooler height: large air coolers can hit the side panel.
Radiator support: an AIO that “fits 360 mm” still needs the correct mounting location and enough clearance from RAM, motherboard heatsinks and the GPU.
Check the PSU against the GPU
Do not choose a PSU by wattage alone. Quality, protections, efficiency, cable layout and the exact GPU power connector matter. Modern power-supply guidance includes the newer 12V-2×6 connector on applicable hardware, but the safe rule is simpler: use the connector type and cable routing specified by your actual PSU and graphics-card manuals.
Never use modular PSU cables from another power supply just because the plugs fit. The PSU-side wiring is not universally standardized between models.
💡 Quick Hack: Make a one-page “compatibility card” before checkout: CPU socket, RAM type, motherboard size, GPU length, cooler height, PSU wattage/connectors, M.2 count and case fan sizes. If every line has a confirmed answer, your odds of a smooth build rise dramatically.
Prepare a Safe, Organized Workspace
A kitchen or dining table is usually better than the carpeted floor. You want bright lighting, room to lay the case on its side, and enough space to keep screws separated.
Static electricity can damage electronic components, even when you do not feel a shock. The EOS/ESD Association ESD fundamentals explain why electrostatic discharge matters around electronics. In practical home-building terms, avoid carpet, periodically touch a grounded metal case or grounded object before handling components, and hold boards by their edges rather than touching contacts.
Set out:
#2 Phillips screwdriver.
Small tray or magnetic parts dish.
Zip ties or reusable hook-and-loop straps.
Motherboard, case and cooler manuals.
Flashlight or phone light.
USB flash drive for Windows.
A second internet-connected device for manuals and driver downloads.
Open each box carefully and keep accessories with their component. Do not throw away the motherboard’s M.2 screws, Wi-Fi antenna, SATA cables or case screw bag.
Prepare the Motherboard Outside the Case
For anyone learning how to build a gaming pc for beginners, doing the delicate motherboard work outside the chassis is easier and safer. Place the motherboard on top of its cardboard box. Avoid building directly on the anti-static bag because the exterior of some bags is conductive.
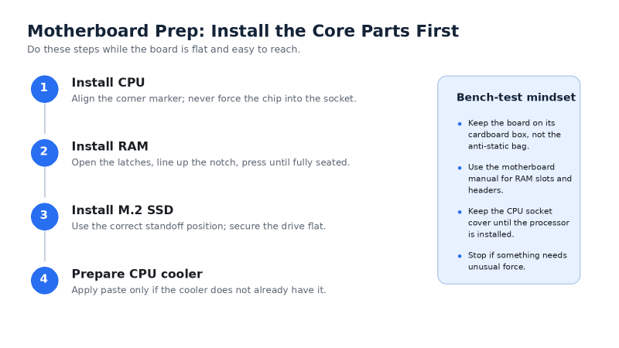
Figure 3. Do the CPU, RAM and M.2 work while the motherboard is outside the case. Install the CPU, RAM and M.2 SSD while the motherboard is flat and easy to reach.
Install the CPU
Open the socket retention mechanism according to the motherboard manual. Hold the CPU by the edges and find the alignment marker—often a tiny triangle or keyed notch.
Lower the CPU straight into the socket. It should settle into position with no pushing, rocking or sliding. If it does not sit naturally, lift it out and recheck alignment.
Close the retention mechanism. Some sockets require more lever pressure than beginners expect; this is normal after you have confirmed the processor is correctly seated.
Install the RAM
Open the required DIMM latches. Align the notch in the RAM stick with the key in the slot, then press down evenly until the latches engage.
A common first-build failure is RAM that appears installed but is not fully seated. Compare both ends of the module and look for an even, level fit.
Install the M.2 NVMe SSD
Locate the preferred M.2 slot. On many boards, the slot closest to the CPU offers the best direct connection, but lane sharing and supported speeds vary by model.
Remove the M.2 heatsink if the board has one. Insert the SSD at a slight angle, press it down gently, secure it with the screw or tool-free latch, and replace the heatsink after removing any protective film from the thermal pad.
💡 Quick Hack: Put every removed heatsink screw in a small labeled cup. M.2 screws are easy to lose and frustrating to replace midway through a build.
Install the CPU Cooler Correctly
Cooler installation differs more than almost any other assembly step, so read the cooler’s socket-specific instructions. Some coolers reuse the motherboard’s stock backplate; others replace it with their own mounting hardware.
If the cooler has factory-applied thermal paste, do not add more. If it is bare, apply the amount recommended by the cooler manufacturer. Intel’s thermal paste application guide is a useful reference for the basic idea: apply paste, lower the cooler with controlled top-down pressure, and tighten the mounting system evenly.
Tighten screws gradually in a cross pattern when the cooler uses four mounting points. Do not fully clamp one corner before starting the opposite side.
Connect the cooler fan to the header labeled CPU_FAN. Many boards will warn or refuse to boot normally if they do not detect a CPU fan signal.
Prepare the Case and Check the Standoffs
Remove both case side panels and lay the chassis flat. Take out any accessory box packed inside the case.
Motherboard standoffs are small threaded spacers that keep the board from touching the metal tray. Their positions must match your motherboard form factor. An extra standoff under a spot with no screw hole can short the board, so compare the case layout with the motherboard holes before installation.
If the rear I/O shield is separate, press it into the case opening now. Many modern motherboards have an integrated I/O shield, which removes this step.
Pro-Tip: Decide where the CPU power cable must pass before the motherboard blocks access. In tight cases, feeding the EPS cable through the top-left routing hole early can save ten minutes of awkward hand gymnastics later.
Mount the Motherboard in the Case
Lower the motherboard into the case by holding its edges and cooler if the cooler is firmly mounted. Align the rear ports with the I/O opening and line the screw holes up with the standoffs.
Start the center screw loosely if your case does not have a locating peg. Then install the remaining motherboard screws. They should be snug, not brutally tight; the goal is to secure the board without crushing the PCB.
At this stage, pause and confirm that no loose screw is trapped under the motherboard.
Install the Power Supply and Route the Main Cables
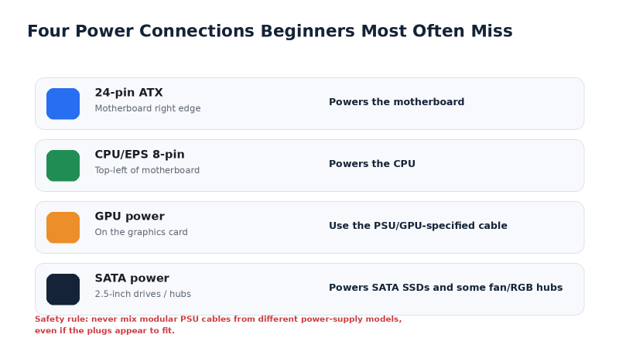
If the PSU is modular, connect only the cables you need before sliding it into a cramped PSU compartment. Typical gaming builds use:
24-pin motherboard cable.
8-pin or 4+4-pin CPU/EPS cable.
GPU power cable or cables.
SATA power if you use SATA drives, fan hubs, RGB controllers or accessories.
Orient the PSU fan toward a ventilated intake. In many modern cases, that means fan-down through a filtered bottom vent. If the case sits on thick carpet, make sure the intake is not suffocated.
Route the 24-pin and CPU/EPS cables through the rear cable-management area, but leave them loose until all major components are installed.
Figure 4. Route the main power cables deliberately and keep connectors fully seated. Route major power cables behind the motherboard tray before final cable management.
Install Additional Storage, Fans and Front-Panel Accessories
If you are using 2.5-inch SATA SSDs or 3.5-inch hard drives, mount them now. SATA drives need both a SATA data cable to the motherboard and a SATA power connector from the PSU.
Figure 5. Plan storage and airflow before closing the case. SATA storage requires both data and power, while M.2 NVMe drives mount directly on the motherboard.
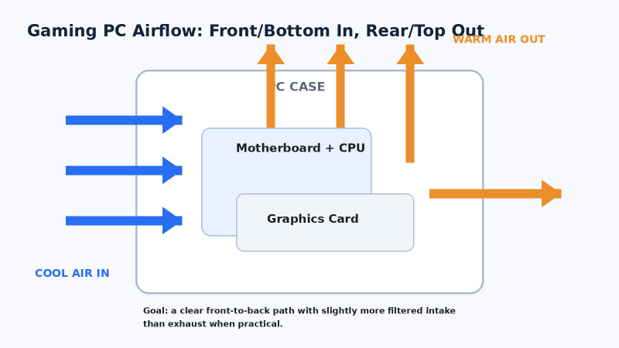
Plan your fan airflow before connecting every fan. A straightforward beginner layout is front or bottom intake, with rear and top exhaust. The frame struts on a typical fan usually indicate the exhaust side, although arrows molded into the frame are even better.
Try to maintain a clear airflow path through the GPU and CPU cooler. Stuffing every available fan mount does not automatically improve temperatures; extra fans can add noise and turbulence without fixing a poor layout.
💡 Quick Hack: If your case includes two or three fans, start with them before buying more. Test temperatures first. You may discover the stock configuration is already sufficient, saving money and cable clutter.
Install the Graphics Card
For a gaming system, the GPU usually belongs in the top full-length PCIe x16 slot connected most directly to the CPU. Check the motherboard manual if multiple full-length slots look similar.
Remove the correct case expansion-slot covers. Open the PCIe slot latch, align the card, then press it straight down until the latch engages. Secure the card to the case with the slot screws.
Large graphics cards can sag. If your card includes a support bracket, use it. The goal is not cosmetic perfection; it is reducing long-term stress on the PCIe slot and card PCB.
Connect GPU power using the cable configuration specified by the GPU and PSU manufacturer. For high-power cards using multiple 8-pin connectors, separate PCIe cable runs may be preferable to daisy-chaining depending on the PSU’s guidance. For 12V-2×6 style connectors, make sure the plug is fully seated and avoid a sharp bend immediately at the connector.
Connect the Small Cables Without Guessing
This is the slowest part of many first builds because the connectors are small and the labels can be hard to read.
Front-panel header
The case power switch, reset switch and power/activity LEDs connect to a pin block usually labeled F_PANEL, JFP1 or similar. Use the motherboard manual’s diagram rather than relying on memory.
The power and reset switches are not polarity-sensitive. LEDs are; if an LED does not light later, the connector may simply be reversed.
Front USB and audio
Connect the case’s USB-A, USB-C and front-audio cables to their matching headers. These connectors are keyed. If a plug will not fit with gentle, even pressure, stop and inspect the orientation.
Fan and RGB headers
Connect fans to CPU_FAN, SYS_FAN or CHA_FAN headers as appropriate. Do not confuse 3-pin 5V addressable RGB with 4-pin 12V RGB; plugging the wrong lighting device into the wrong voltage header can damage it.
Main power cables
Seat the 24-pin motherboard cable and CPU/EPS cable firmly. The EPS connector near the top-left of the board is easy to forget, and a machine missing CPU power may light up fans without completing POST.
💡 Quick Hack: Before closing the back panel, photograph the cable side of the case. If you add a drive or fan later, that photo becomes a map showing where spare connectors and cable channels are hiding.
Do a Pre-Boot Inspection
Before connecting wall power, run this checklist from top to bottom:
CPU cooler is firmly mounted.
CPU fan is connected to CPU_FAN.
RAM is fully seated in the recommended slots.
M.2 SSD is secured and its heatsink film was removed.
24-pin motherboard power is connected.
CPU/EPS power is connected.
GPU is fully seated and screwed to the case.
GPU power is connected if required.
Front-panel power-switch cable is on the correct pins.
No loose screws are inside the case.
Monitor cable is connected to the graphics card, not the motherboard, when using a discrete GPU.
That final point causes a surprising number of “dead PC” scares. If your CPU lacks integrated graphics, the motherboard video ports may never produce an image.
First Boot and BIOS Setup
The first power-on is the moment most people worry about when learning how to build a gaming pc for beginners. Expect the first memory training process on some modern platforms to take longer than a normal boot, especially with new DDR5 configurations. Avoid repeatedly cutting power after only a few seconds unless the motherboard manual indicates a fault.
Figure 6. First boot should move from POST to BIOS checks, Windows, drivers and testing. After the hardware passes POST, confirm detection and temperatures in BIOS before installing the operating system.
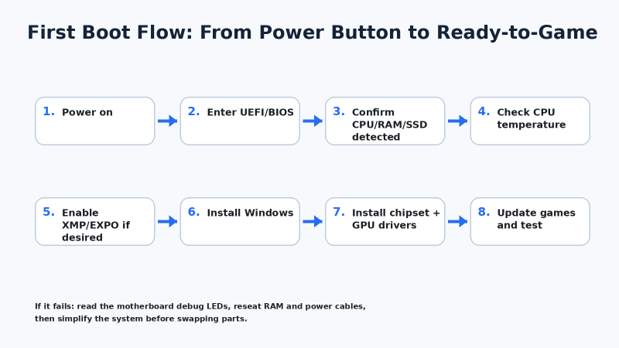
Enter the UEFI/BIOS—commonly with Delete or F2—and verify:
Correct CPU model appears.
Total RAM capacity is correct.
SSD is detected.
CPU temperature is reasonable at idle in BIOS.
CPU fan is spinning and reporting RPM.
Do not begin with manual overclocking. Establish a stable baseline first.
Enable XMP or EXPO carefully
Memory kits often boot at conservative default speeds until you enable an XMP or EXPO profile. Turn on the appropriate profile only after the machine successfully boots at stock settings.
If enabling the profile causes crashes or boot loops, return to default memory settings, update the BIOS if appropriate, and troubleshoot stability before assuming the RAM is defective.
Install Windows, Drivers and Updates
On another PC, create a bootable installer using Microsoft’s Windows 11 installation media guide. The tool can prepare a USB drive for a clean Windows installation.
Boot the new PC from the USB drive, select the intended SSD, and complete setup. If the drive is new and empty, Windows Setup can create the necessary partitions automatically.
Once on the desktop, install:
- Motherboard/chipset drivers from the chipset or motherboard vendor.
- Network/Wi-Fi drivers if Windows did not install them.
- Current graphics drivers from the GPU manufacturer.
- Windows updates, including required restarts.
- Audio or specialty motherboard utilities only if you need them.
Avoid installing every bundled motherboard utility simply because it exists. Extra monitoring, RGB, updater and “optimization” tools can add background services and make troubleshooting harder.
If you have files from another computer, this is also a good time to review MyFlexBots’ guide on how to back up your computer before migrating important game saves, project files or photos.
Test Temperatures, Stability and Real Gaming Performance
A successful Windows boot does not prove the build is healthy under load. Test it before spending hours customizing RGB profiles and game libraries.
Start with basic checks:
CPU temperature at idle and under a sustained CPU workload.
GPU temperature during a demanding game or graphics benchmark.
Memory stability.
SSD health and expected capacity.
Fan behavior under load.
Game performance at your monitor’s native resolution.
Compare temperatures against the safe operating guidance for your exact CPU and GPU model rather than chasing one universal number. Modern processors often use boost algorithms that intentionally run warmer under heavy loads when thermal headroom is available.
If the PC crashes only during games, suspect GPU power, drivers, memory instability or temperatures before reinstalling everything blindly.
Common Mistakes to Avoid
Understanding how to build a gaming pc for beginners also means knowing which shortcuts create problems later. These five mistakes account for a large percentage of failed first boots and unnecessary returns.
- Buying incompatible parts
The wrong CPU socket, DDR generation, case clearance or PSU connector can halt the project before assembly. Validate compatibility before checkout and again when the boxes arrive.
- Forgetting the CPU power cable
The 24-pin connector is obvious; the CPU/EPS connector is tucked near the top of the motherboard and is easier to miss. Fans and lights can sometimes run even when the CPU is not receiving the power required to POST.
- Installing RAM halfway
RAM often requires firmer pressure than beginners expect. If the DRAM debug light stays on, power down and reseat the memory before assuming a component is dead.
- Using too much force
CPUs, RAM, GPUs and connectors are keyed. Some require firm pressure, but none should require twisting, hammering or bending the board dramatically. When resistance feels wrong, stop and recheck alignment.
- Closing the case before the first boot
Do not spend twenty minutes creating perfect cable bundles before confirming the machine works. Keep panels off until POST, BIOS detection and basic temperatures look normal.
💡 Quick Hack: Build for reversibility. Leave cable ties slightly loose, keep accessory screws in the motherboard box, and avoid adhesive cable mounts until the system passes testing. Troubleshooting is easier when every part can be removed without undoing a sculpture.
Advanced Tips and Next-Level Hacks
Once the machine is stable, the next stage of how to build a gaming pc for beginners is improving noise, thermals and usability without immediately buying new hardware.
Tune fan curves instead of running fans at full speed
A well-tuned fan curve keeps the PC quiet at the desktop and ramps airflow only when temperatures rise. Use BIOS fan controls first; they work without extra background software.
Create gradual curves rather than sudden jumps. Rapid RPM swings are often more annoying than a slightly higher constant speed.
Use a mild GPU undervolt when it makes sense
Some graphics cards can maintain nearly the same gaming performance at lower voltage, reducing power consumption, fan noise and heat. Undervolting is not guaranteed and requires stability testing, but it can be a more useful refinement than chasing a tiny overclock.
Separate storage by purpose only when it solves a real problem
You do not need one SSD for Windows and another for games merely because older PC advice said so. A large, fast NVMe SSD can simplify a beginner build. Add a second drive when capacity, backup strategy or workload separation justifies it.
Keep an upgrade path in mind
A power supply with sensible headroom, a case with good airflow, spare M.2 slots and an upgrade-friendly motherboard can extend the machine’s life. This matters more than buying the most expensive component in every category.
For ideas beyond the tower itself, MyFlexBots’ roundup of trending gadgets worth watching can help you prioritize monitors, accessories and smart-device upgrades after the core PC is finished.
Record your working BIOS settings
Take phone photos of important BIOS screens after the machine is stable. If a future firmware update resets settings, you can quickly restore fan curves, memory profiles and boot configuration.
Pro-Tip: Change one performance setting at a time. If you enable a memory profile, undervolt the GPU, change CPU power limits and rewrite fan curves in one session, you will not know which change caused a crash.
Troubleshooting: What to Do When the New PC Does Not Work
Troubleshooting how to build a gaming pc for beginners should be systematic, not random. Read the motherboard’s debug LEDs or POST code first, then simplify the system until the fault becomes obvious.
Nothing happens when you press the power button
Check the wall outlet, PSU switch and power cable. Then verify the case power-switch connector is on the correct front-panel pins.
Confirm the 24-pin and CPU/EPS power plugs are fully seated. If you are comfortable doing so, the motherboard manual may explain how to momentarily bridge the two power-switch pins with a screwdriver to test whether the case button is the problem.
Fans spin but there is no display
Make sure the monitor is on the correct input and connected to the graphics card. Reseat the GPU and RAM, then check the GPU power connector.
If the motherboard has debug LEDs, note whether CPU, DRAM, VGA or BOOT remains illuminated. That indicator is more useful than swapping five parts at once.
The system turns on and off repeatedly
On a new DDR5 platform, initial memory training can involve restarts. Give it the time described by the motherboard documentation.
If it never completes POST, clear CMOS according to the manual and try one RAM stick in the recommended single-module slot. Disable XMP/EXPO until the machine is stable at defaults.
CPU temperature is immediately too high
Shut the system down if temperature rises abnormally fast. Check whether the cooler pump or fan is connected, the cooler mounting hardware matches the socket, the protective film was removed from the cold plate, and the mounting pressure is even.
Do not solve a bad cooler mount by simply adding more thermal paste. The mechanical contact is the priority.
SSD is not detected
Reseat the M.2 drive and check whether that slot is disabled by a specific motherboard configuration or shares lanes with another port. Consult the manual for slot limitations.
For SATA drives, verify both the data cable and SATA power connector.
Random crashes during games
Return performance settings to stock. Disable the memory overclock profile temporarily, remove GPU overclocks/undervolts, and monitor CPU/GPU temperatures.
Update chipset and graphics drivers, then test memory and a known demanding game. A crash under combined CPU/GPU load can also point to power-delivery or PSU-cabling issues.
The PC is much louder than expected
Check fan orientation and fan curves. A fan running at full speed because it is connected to the wrong control mode can make a perfectly healthy machine sound broken.
Also look for cables touching fan blades, a GPU support bracket contacting a fan shroud, or panels that vibrate at specific RPM ranges.
Long-Term Maintenance: Keep the Build Fast and Reliable
Finishing how to build a gaming pc for beginners is not the end of ownership. A few simple maintenance habits prevent heat, storage and software problems from turning into expensive repairs.
Every month or two
Check that the front and bottom dust filters are not clogged.
Make sure fans still spin normally.
Review free storage space.
Install normal security and driver updates from trusted sources.
Every three to six months
Power the PC down, disconnect it, and clean dust filters. If the interior needs cleaning, use controlled bursts of compressed air while preventing fans from spinning freely at extreme speed.
Inspect major power connectors and cable routing while the panel is open. You are looking for loose plugs, discoloration, damaged insulation or a cable that has shifted into a fan.
Before major BIOS or hardware changes
Back up important files and record your current BIOS settings. MyFlexBots’ back up your computer guide explains practical backup options and restore testing so a hardware upgrade does not become a data-loss event.
Keep drivers boring
You do not need to update every driver the day it is released. Prioritize security updates, fixes relevant to your games, chipset/firmware updates recommended for your platform, and graphics drivers when they improve or fix titles you actually play.
💡 Quick Hack: Create a small folder named “PC Build Records” containing receipts, component serial numbers, motherboard manual PDF, BIOS notes and warranty links. Future-you will appreciate it when a drive fails or you need to identify an exact PSU model.
Frequently Asked Questions
These answers cover the questions that most often appear after someone searches how to build a gaming pc for beginners and starts comparing parts or planning the first assembly session.
Is building a gaming PC hard for a complete beginner?
No. The mechanical steps are straightforward if you buy compatible parts and follow the manuals. The challenging parts are usually selecting compatible hardware, connecting small front-panel cables, and staying patient during troubleshooting. A careful first-time builder can complete the project without prior repair experience.
How long does it take to build a gaming PC for the first time?
Most beginners should reserve two to four hours for assembly, plus time for Windows, updates, drivers and testing. A complicated liquid-cooling setup, tight mini-ITX case or troubleshooting session can take longer. Do not treat build time as a performance metric.
What is the best order for installing PC parts?
Install the CPU, RAM and M.2 SSD on the motherboard first. Prepare the cooler, then mount the motherboard in the case. Add the PSU, drives/fans, graphics card and cables. Finish with a pre-boot inspection, BIOS check, Windows installation and stability testing.
Can I build a gaming PC without an anti-static wrist strap?
Yes, many home builders do, but you should still control static risk. Work on a hard surface, avoid carpet, touch a grounded metal object before handling components, and hold boards by their edges. A wrist strap is inexpensive if you want a more controlled approach.
How much should a beginner spend on a gaming PC?
There is no single correct budget because your monitor resolution, games, local prices and performance target matter more than a round number. Spend enough to meet your real target, put a healthy share into the GPU, and avoid sacrificing PSU quality, cooling or storage just to reach a higher CPU tier.
What should I do if my new gaming PC turns on but shows no picture?
First connect the monitor to the graphics card, confirm the correct monitor input, and check GPU power. Then reseat RAM and the graphics card, read the motherboard debug LEDs, and try a minimal configuration. Avoid changing several parts at once because that hides the actual cause.
Conclusion
Learning how to build a gaming pc for beginners is mostly an exercise in preparation and verification. Choose compatible parts, do the delicate work on the motherboard outside the case, connect power deliberately, check everything before first boot, and test the system at stock settings before chasing performance tweaks.
Once you have built one PC, the mystery disappears. You will also understand exactly which part to upgrade later, how airflow and power delivery affect performance, and how to diagnose problems without immediately paying for a repair shop
editor's pick
latest video
news via inbox
Nulla turp dis cursus. Integer liberos euismod pretium faucibua