How to Remove Background Noise from Video 7 Fixes
speaker. Learning how to remove background noise from video makes an interview, lesson, product demo, or travel clip easier to understand without forcing viewers to reach for the volume button. This guide shows what to fix, which tools suit the problem, and how to keep voices natural.
Quick answer: the fastest way to clean noisy video
To remove background noise from video, duplicate the original clip, and identify whether the problem is steady hiss, wind, hum, or A crisp shot can still feel amateur when traffic, fans, wind, or buzzing equipment drown out the people’s voices, then apply a suitable noise-reduction or speech-enhancement tool. Start gently, compare before and after, correct any muffled dialogue, and export a test clip before processing the full video.
What noise removal can—and cannot—fix
How to remove background noise from video depends on what the microphone actually captured. Noise reduction is not one universal switch. A constant air-conditioner hum leaves a relatively predictable frequency pattern; a passing motorcycle changes throughout the recording. Denoising software can suppress both to different degrees, but every adjustment risks removing part of the voice along with the interference.
The key is separating unwanted sound from wanted speech, then deciding what “clean enough” means. A little room tone may sound more believable than speech that has been processed until it resembles a robot speaking underwater.
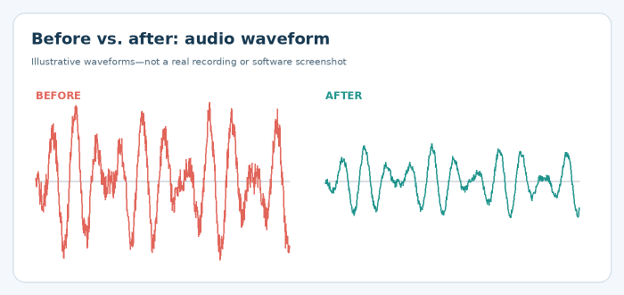
Figure 1. Moderate noise reduction shrinks constant interference while preserving the speaker’s changing waveform.
Essential tools and materials: what actually matters
For most jobs, the “materials” are files, headphones, and software rather than physical supplies. The right combination depends on whether the video needs a quick social-media fix or careful restoration for a paid client.
| Tool or material | What it is best for | Typical budget | Skill |
| Headphones with reliable detail | Hearing his, pumping, and artifacts | Use existing pair; upgrades vary. | Beginner |
| Original video and backup | Reversible editing and comparison | Free | Beginner |
| Audacity | Noise-profile cleanup and EQ of extracted audio | Free | Beginner–intermediate |
| Video editor with denoise | Convenient editing without round trips | Free or paid, varies by product | Beginner |
| AI speech enhancement | Rapid speech-focused cleanup | Free tiers or paid plans vary. | Beginner |
| Adobe Audition or similar DAW | Spectral repair, hum, clicks, and complex mixing | Paid subscription or license | Intermediate |
| External mic / windscreen | Preventing noise at capture | Optional; varies widely | Beginner |
Prices and free-tier limits change. Treat these as planning categories, not current product quotes; confirm licensing and export restrictions before committing to an app.
Diagnose the actual noise before touching a slider.
For anyone asking how to remove background noise from video, diagnosis comes before software. Import the clip, put on headphones, and listen once at normal volume. Write down where the sound begins, whether it is constant, and whether it overlaps speech. Make a second pass at moderate volume rather than repeatedly turning the clip up until every tiny room sound seems unacceptable.
Find a stretch where nobody is talking. If the same fan, hiss, or room tone continues there, a noise profile can help.
Mark transient events such as keyboard taps, door slams, and microphone knocks; treat them as individual repairs.
Listen for low rumbles, sharp whistles, and electrical buzz. These often call for targeted filters rather than broad AI cleanup.
Notice reverberation. Echo is reflected speech, not ordinary background noise, and often needs a dereverb function or rerecording.
💡 Quick Hack: Make a ten-second problem sample covering both speech and a quiet pause. Perfect that small region first; processing a 40-minute video to test each setting wastes time.
Protect the source and prepare the timeline.
Copy the source media into a named project folder and retain the unedited original. Duplicate its audio track or make a new sequence so every processing pass can be compared with untouched sound. Avoid exporting and re-importing the clip repeatedly because lossy compression can make artifacts harder to diagnose.
Before denoising, split off obviously unrelated audio such as licensed music, sound effects, or audience applause when the editor permits separate tracks. Speech-enhancement systems can mistake these elements for noise and reshape them unpredictably.
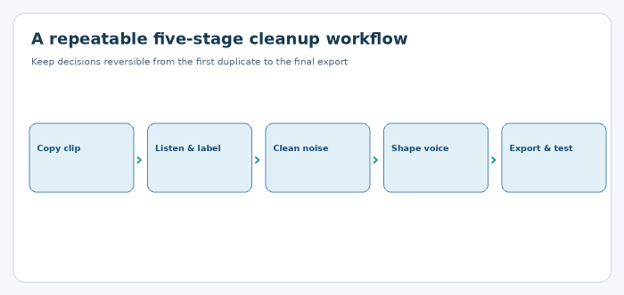
Figure 2. Use this sequence for interviews, tutorials, reels, and product videos.
Remove steady hiss or fan noise with Audacity.
How to remove background noise from video with free desktop software starts with a reliable noise sample. Audacity is a strong zero-cost starting point when the problem is consistent air-conditioner noise, computer-fan hiss, or a steady electronic buzz. It works on audio, so video creators generally extract the audio or export a WAV copy from their editing application, process it, and return the cleaned file to the video timeline.
Audacity: noise profile method
Export or extract the video’s audio as WAV, ideally at the original project sample rate. Preserve the source video and audio alignment.
Open the audio in Audacity. Select a few seconds containing only background noise, not talking or music.
Choose Effect > Noise Removal and Repair > Noise Reduction, and click Get Noise Profile. Menu labels can vary slightly across versions.
Select the portion that needs treatment, or select the whole track if the same noise continues throughout.
Reopen Noise Reduction. Begin near the modest default settings, preview, and increase attenuation only as needed.
Try the Noise Only output preview where available. If it contains obvious words or consonants, the filter is removing wanted content; reduce the strength.
Export a cleaned WAV, import it beneath the video, and align it with the first frame or a recognizable clap. Mute the noisy original while checking synchronization.
Audacity notes that this method works best on steady noise and is much less effective for unpredictable crowds, traffic, and single impact sounds. Its official instructions describe the two-pass profile process.
Reference: Audacity Noise Reduction manual.
💡 Quick Hack: Instead of chasing complete silence, leave a little continuous ambience. Natural room tone hides harsh transitions and usually makes lightly cleaned speech sound more convincing.
Clean video audio directly in a video editor.
A video editor with built-in audio repair is often the shortest route for a YouTube Short, tutorial, or quick client revision. Software labels vary—look for Denoise, Voice Isolation, Reduce Noise, Enhance Speech, or Audio Repair instead of assuming every editor has the same menu.
Create a copy of the edit and disable any previous enhancement preset.
Select the dialogue clip, not the entire soundtrack or music bus.
Enable the voice or noise feature at a low to medium setting, depending on the available controls.
Preview the loudest phrase and the quietest phrase; quiet syllables expose overprocessing first.
Use a high-pass filter only when low rumble is present, and stop raising its cutoff once the voice begins to thin.
Adjust level after repair, not before. Strong gain applied to a noisy track amplifies the noise and makes judging cleanup more difficult.
Some editors apply AI enhancement through remote services. Review the service’s privacy policy before uploading confidential interviews, unpublished client material, or videos containing personal information.
Use AI speech enhancement for difficult dialogue
How to remove background noise from video when traffic interrupts speech is a different challenge than fixing a fan. An AI background noise remover can be useful when speech is mixed with crowds, traffic, or household activity, and traditional noise profiling leaves too much interference. Speech-focused models prioritize spoken words, often at the cost of natural breaths, room acoustics, or non-speech sounds.
Pick one difficult 15–30 second section and process it through the available enhancement feature.
Compare the enhanced and original clips at matched playback loudness. Louder audio tends to sound “better” even when detail has been lost.
Listen for consonants such as s, f, and t, which may become smeared, metallic, or overly crisp.
Check whether two overlapping speakers remain intelligible. AI cannot reliably reconstruct words that were never recorded clearly.
If the processed result feels synthetic, reduce the blend or enhancement amount, or mix some original audio back in where the software permits.
💡 Quick Hack: Apply AI treatment only to the noisiest scenes. A selective workflow preserves natural sound elsewhere and may reduce cloud-processing usage or paid minutes.
Remove wind noise, rumble, and electrical hum.
Wind turbulence striking a microphone makes irregular, often very low-frequency blasts. A low-cut or high-pass filter can reduce the bottom-end rumble, but severe wind can overload the microphone, permanently distorting the recorded voice. Use short listening passes so the filter does not turn a full voice into a thin telephone-like tone.
Electrical hum is more stable. Depending on the recording environment, power-related tones can be near 50 Hz or 60 Hz, often with harmonics. A notch filter, or specialized dehum tool, targets these peaks more precisely than broadband denoising.
Abrupt clicks and isolated bangs may respond better to manual clip repair, automation, or a click-removal effect. If the sound lands directly on an essential word, restoration may remain imperfect.
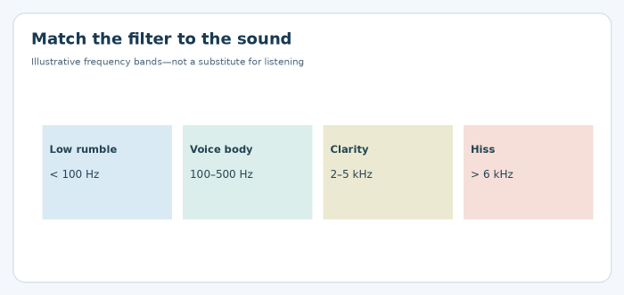
Figure 3. Frequency ranges are approximate starting points; identify problem frequencies by ear and with a spectrum display.
💡 Quick Hack: When low-frequency rumble is the main problem, test a gentle high-pass filter before enabling heavy AI noise removal. Solving one narrow issue can avoid processing the entire vocal spectrum.
Finalize loudness, synchronization and export
Once the noise is controlled, listen to the voice in context with the backing music. Reduce music under narration instead of trying to make a weak recording overpower it. Use gentle compression only if speech level varies significantly, then normalize or limit carefully to avoid clipping.
Export a short preview using the platform’s expected format and listen through phone speakers, laptop speakers and headphones. Check the beginning, a transition and the last ten seconds for missing audio, drift or sudden ambience changes. Only then render the final deliverable.
For most web videos, keeping the original project sample rate—commonly 48 kHz—and exporting in a suitable AAC audio track inside an MP4 container is a practical choice. Exact delivery specifications should follow the receiving platform or client brief.
How to remove background noise from video on a phone
How to remove background noise from video on a mobile device is often a matter of finding the right editor controls. A smartphone can handle light fixes without a computer. Most mobile editors let creators detach audio, adjust gain and use a built-in noise-reduction option. The exact buttons differ by application, operating system and version, so treat the process below as a device-independent checklist.
Duplicate the video in the phone gallery or editor before changing it.
Open the clip and find Audio, Sound, Voice or Enhance settings.
Apply gentle voice cleanup and replay sections with quiet dialogue.
Lower background music separately if there is a music track.
Export at the original frame rate and verify that the voice stays synchronized with mouth movement.
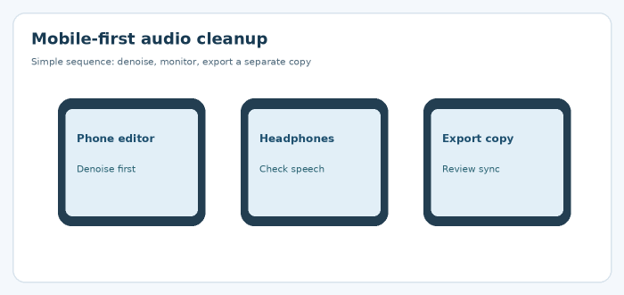
Figure 4. The exact setting labels differ among mobile editing apps; the verification steps stay the same.
💡 Quick Hack: If an editor has no denoise control, export the audio to a supported sound editor, clean it there and replace the phone video’s soundtrack. Keep a synchronization marker so the replacement starts at the correct time.
Which method is best? Compare the seven practical fixes
| Type of problem | Best first action | When to change approach |
| Constant fan or hiss | Noise print / conventional denoise | Voice turns metallic |
| Traffic behind dialogue | Selective AI speech cleanup | AI distorts words or ambience |
| Wind bursts | High-pass plus selective repair | Mic has clipped severely |
| Mains buzz | Notch or de-hum | Hum shifts frequency |
| Keyboard clicks | Manual edit / de-click | Clicks coincide with speech |
| Echoing room | Dereverb or rerecord | Words remain unclear |
| Music too loud | Lower music track / ducking | Music is baked into one file |
Five common mistakes that ruin cleaned audio
- Using maximum noise reduction
The strongest setting is rarely the cleanest. Heavy suppression can create metallic tails, “underwater” syllables and unnatural silence between phrases. Reduce strength until speech sounds normal, even if low-level ambience remains.
- Capturing a noise profile that contains speech
A profile trained on breathing or spoken syllables may suppress those sounds later. Select a genuine no-speech gap, and if none exists, use a different cleanup method rather than teaching the filter the wrong target.
- Trying to repair clipping with a noise filter
Clipping occurs when a loud signal overloads the recording chain, flattening waveform peaks. Noise removal cannot recover all information that was never captured. Test a dedicated declipper, reduce the apparent harshness, or rerecord crucial lines.
- Treating music, ambience and dialogue together
One aggressive setting across a completed mix may damage the music while barely improving speech. Separate tracks before treatment wherever possible and make scene-specific adjustments instead of one global preset.
- Judging only through laptop speakers
Small speakers can hide hiss, high-frequency warble and bass distortion. Use headphones for editing, then check an ordinary phone and laptop before publishing; different playback devices reveal different weaknesses.
Advanced tips: make cleanup sound professional
Professional restoration is largely about restraint, order and repeatability. A reliable workflow might be targeted hum removal, moderate broadband cleanup, light equalization, subtle dynamics processing and final loudness correction—not five unrelated enhancement plugins stacked at high strength.
Use spectral editing for isolated events. A visual spectrogram helps locate narrow whistles, squeaks or chirps without flattening an entire performance.
Automate the repair by scene. A windy outdoor shot and an indoor voiceover should not share identical settings.
Match room tone at cuts. Fill abrupt silent gaps with a low, consistent ambience bed sourced from the same location.
Use a reference clip. Keep 10 seconds of naturally recorded speech to compare timbre, consonants and apparent distance.
Separate dialogue from music at capture whenever possible. A dedicated microphone track is easier to repair than a single mixed recording.
Adobe documents both ordinary noise reduction and spectral, adaptive and diagnostic tools, with the amount of removal balanced against the quality of the remaining signal.
Technical reference: Adobe audio restoration guide.
Pro-Tip: Build three lightweight preset families—indoor fan, outdoor rumble and interview dialogue—then adjust by ear. Presets should accelerate the first pass, never replace listening.
Troubleshooting: when the output sounds worse
The voice sounds underwater or robotic
Reduce denoise strength, lower AI speech-enhancement intensity and undo unnecessary frequency smoothing. Compare at equal volume; if the original sounds more natural, use the original as the foundation and apply only a targeted filter.
Hiss disappears between words but returns during speech
This is a common sign of aggressive gating or voice activity detection. Reduce gate strength, lengthen transitions where supported, or replace the gate with broadband suppression that works throughout the phrase.
How to remove background noise from video
The processed audio is out of sync with the picture
Verify that the replacement audio starts at the same timeline position as the original. Check frame-rate interpretations, trim boundaries and whether any app inserted silence during export. Align an obvious consonant or hand clap to a visible moment.
A low buzzing remains after cleanup
Inspect the spectrum for repeating low-frequency peaks and test a de-hum or narrow notch approach. Avoid removing a broad chunk of the lower voice range simply because the fundamental hum is located there.
Speech is too quiet after denoising
First match the output level to the original, then use modest gain and compression if necessary. If speech still vanishes behind music, reduce the competing music rather than applying endless gain to damaged dialogue.
Wind noise is still masking entire words
Try selective high-pass filtering and speech enhancement on only those affected moments. Where low-frequency blasts cover the entire word or overload the mic, use captions, voiceover replacement or a clean rerecording instead of promising full restoration.
Long-term workflow maintenance
Archive the original camera files, a high-quality cleaned audio master and the final video. Record which tool and settings produced the approved result. For repeat clients or channels, periodically review presets and sample-rate/export choices after software updates; algorithms and labels can change.
Keep several seconds of natural room sound from every shooting location. In future edits, that room tone can bridge cuts cleanly, and it provides useful evidence of constant noise for a noise-profile tool.
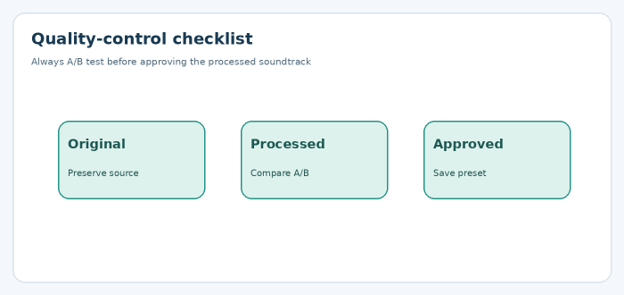
Figure 5. Preserve the raw file, compare at matched volume and document the successful settings.
Preventing background noise in future recordings
How to remove background noise from video is useful knowledge, but avoiding the problem while shooting is better. Prevention is cheaper than repair. Place the microphone closer to the speaker without causing plosives, switch off fans and noisy equipment when possible, and position the camera away from streets, refrigerators or air vents. Treat an echoing room with soft furnishings, or move to a quieter room rather than relying on software to manufacture clarity.
Outdoor shoots benefit from an appropriate foam windscreen or furry windshield designed for the mic. Test the setup by recording ten seconds of dialogue and ten seconds of room or outdoor ambience before the real take. Monitor through headphones if available.
When adding background music after cleanup, use properly licensed tracks and check the conditions of each license. YouTube explains its own Audio Library and its permitted uses in the official help documentation.
Licensing reference: YouTube Audio Library help.
Frequently asked questions
Can background noise be completely removed from a video?
Sometimes, when noise is faint and steady, it can be lowered until it is practically inaudible. Severe wind, clipping, overlapping speech and sounds sharing the voice’s frequencies cannot always be removed without artifacts. The goal is intelligible, credible speech rather than mathematical silence.
What is the best free way to remove background noise from video?
Audacity is a practical free choice for steady hum and hiss after extracting the audio. A free video editor with a basic denoise option may be easier for short clips. Test restrictions such as watermarks, export quality and limits instead of assuming every “free” online tool is unrestricted.
How do I remove background noise from video without losing voice quality?
Start with the mildest effective setting, isolate only the affected areas, and preview at equal playback level. If words or breaths become metallic, back off. Avoid combining multiple aggressive AI enhancers and preserve the raw audio for comparison.
Can AI remove traffic noise while someone is talking?
AI speech enhancement may lower passing vehicles substantially when speech remains audible in the original recording. Results differ depending on overlap, microphone quality and how much traffic dominates the signal. Always inspect quiet words, names and consonants after processing.
Can I remove background noise from a video on Android or iPhone?
Yes. Many mobile video editors offer voice enhancement or noise reduction, but the availability, cost and labels depend on the app and version. Duplicate the clip, process a short sample and verify the exported audio stays synchronized.
Why does my audio sound robotic after using denoise?
The processor likely removed part of the speech spectrum along with noise, or reconstructed speech too aggressively. Lower the reduction setting, bypass extra enhancement effects and restore some natural ambience. If necessary, apply targeted EQ or hum removal rather than universal suppression.
Conclusion: clean speech beats perfect silence
The best answer to how to remove background noise from video is to diagnose the noise first, pick the least destructive tool, process in small passes and compare before exporting. A modest, carefully checked cleanup often beats an aggressive one-click effect, especially on voices that viewers need to trust.
For more practical creator workflows and tool comparisons, explore MyFlexBots at myflexbots.com. What has been hardest to fix in your videos: wind, traffic, fan hiss or voices in the background? Share your example in the comments.
editor's pick
latest video
news via inbox
Nulla turp dis cursus. Integer liberos euismod pretium faucibua