How to Record Gameplay: Easy Step-by-Step Guide
Before touching a recording setting, decide what the finished video is for. A 15-second Discord clip and a 45-minute YouTube walkthrough do not need the same resolution, encoder, audio routing, or storage plan.
For most players, How to Record Gameplay is the practical sweet spot. It preserves motion well, edits smoothly on modest hardware, and keeps file sizes manageable. Use 1440p or 4K only when the game already runs comfortably above your target frame rate and you have enough storage for larger files.
If your priority is competitive performance, protect the game first. A clean 1080p60 recording with stable frame pacing looks better than a technically sharper 4K file filled with dropped frames and stutter.
Essential Tools & Materials Breakdown
You can start for free if you already own a gaming device. Spend money only when a specific limitation appears — usually microphone quality, storage, or console-to-PC capture.
| Tool / Material | What It Does | Estimated Cost | Skill Level | Practical Note |
| Gaming PC or console | Runs the game and creates the source signal | $0 if already owned | Beginner | Leave 15–25% performance headroom when possible |
| Recording software | Captures video/audio on a computer | $0 | Beginner | OBS Studio offers the most control; built-in tools are faster |
| Hardware encoder | Encodes video on the GPU/iGPU | $0 with supported hardware | Beginner | NVENC, AMD hardware encoding, Intel QSV, Apple VT |
| Microphone or headset | Adds commentary/voice chat | $0–$100+ | Beginner | A basic USB mic can outperform an expensive mic used badly |
| Fast storage | Holds high-bitrate recordings | $0–$120+ | Beginner | SSD preferred for long or high-resolution captures |
| Capture card | Brings console/second-PC HDMI into a computer | $70–$250+ | Intermediate | Needed for advanced console overlays, webcam scenes, or long-form capture |
| Video editor | Trims, levels audio, adds captions | $0–$300+ | Beginner–Advanced | Free editors are enough for most gameplay videos |
Choose the Recording Method That Fits the Job
The first decision in how to record gameplay is not “Which app has the most buttons?” It is “How much control do I actually need?” Pick the simplest tool that can produce the result you want.
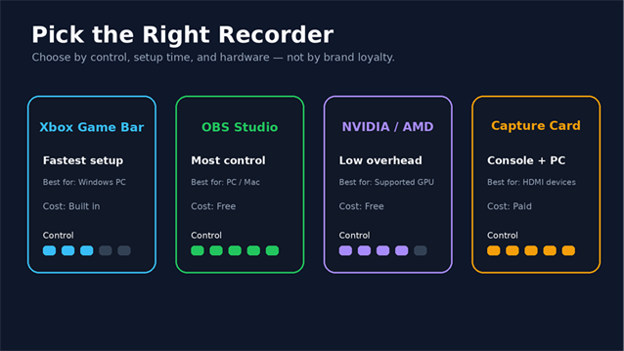
Use Xbox Game Bar when you want a fast Windows recording with almost no setup. Use OBS Studio when you want scene control, separate audio tracks, webcam overlays, capture cards, or reusable profiles. If your PC has a supported NVIDIA or AMD GPU, the vendor capture tool is often the lowest-friction choice for clips and instant replay.
For consoles, built-in capture is excellent for highlights. A capture card becomes worthwhile when you want a face camera, custom overlays, longer sessions, higher-production streams, or direct recording to a PC.
- Fastest on Windows: Xbox Game Bar.
- Best free all-rounder: OBS Studio.
- Best for effortless PC highlights: NVIDIA App or AMD Software.
- Best for console production: Built-in capture for clips; capture card + OBS for full control.
| 💡 Quick Hack: If you only want highlight clips, enable a replay buffer or Instant Replay instead of recording the entire session. You save storage and spend less time scrubbing through dead footage. |
Windows Xbox Game Bar: The “Just Record It” Option
On Windows 11 and Windows 10, Xbox Game Bar is built for quick capture. Open the game, press Windows + Alt + R to start or stop recording, and use Windows + Alt + M to toggle the microphone. Recordings are saved as MP4 files in the Videos\Captures folder.
Game Bar is ideal when you do not need overlays, multiple audio tracks, complex scenes, or camera framing. It also makes a good diagnostic tool: if OBS stutters but Game Bar records smoothly, your problem is probably in OBS scene complexity or encoder settings rather than the game itself.
OBS Studio: Best When You Want Control
If your goal is to master how to record gameplay for YouTube, tutorials, streaming, or long-form projects, OBS Studio is the strongest free option. It can capture a specific game, a window, a display, a capture card, a webcam, and multiple audio sources in one scene.
OBS also lets you build different profiles for 1080p recording, 1440p recording, streaming, or low-power laptop capture. That prevents a common mistake: changing half a dozen settings for one job and forgetting what you changed before the next session.
NVIDIA App and AMD Software: Best for Low-Friction Highlights
NVIDIA’s current app includes ShadowPlay capture with manual recording and Instant Replay. On supported hardware it can use the GPU’s dedicated encoder, which helps reduce CPU load. NVIDIA also advertises high-resolution HDR capture on supported GPUs and AV1 recording for RTX 40-series hardware.
AMD Software: Adrenalin Edition includes Record features in the full installation. It is a practical choice for Radeon users who want gameplay recording without building an OBS scene. Keep the driver current, especially if recording or replay files fail to save.
Set Resolution, Frame Rate, and Encoder Without Wasting Performance
Good how to record gameplay settings are a balancing act between image quality, file size, and the frame rate you feel while playing. Start conservative, make a one-minute test, and increase quality only when the test is smooth.
Resolution: Match the game or output to 1920×1080 for the safest default. Recording 1440p or 4K makes sense when the source is genuinely that sharp and the audience or editing workflow benefits from it.
Frame rate: Use 60 fps for shooters, racing games, sports, and fast camera motion. Use 30 fps for slower strategy games, turn-based titles, simple tutorials, or older hardware where 60 fps recording creates dropped frames.
Encoder: Prefer a modern hardware encoder when available. NVIDIA NVENC, AMD’s hardware encoder, Intel Quick Sync, and Apple VideoToolbox can move much of the encoding work away from the CPU. Software x264 can still look excellent, but it may compete with CPU-heavy games.
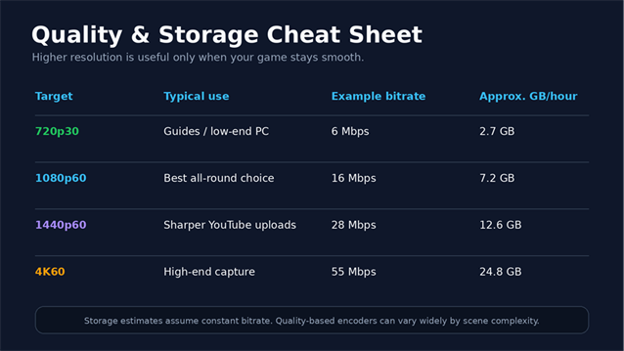
- 720p30: Low-end systems, simple tutorials, small uploads.
- 1080p60: The best default for most gaming channels and highlight clips.
- 1440p60: Good for high-end PCs and sharper YouTube presentation.
- 4K60: Use only when the system, storage, editor, and upload workflow can handle it.
| 💡 Quick Hack: Cap a game that runs at 200+ fps to a stable value your display still feels good at. The spare GPU headroom can eliminate encoder overload without changing recording quality. |
Bitrate and Quality Targets That Make Sense
If your recorder offers a quality-based mode such as CQP, CQ, or a similar constant-quality control, use that for local recording when possible. It lets easy scenes use fewer bits and complex scenes use more. If you must use a fixed or constrained bitrate, a practical starting point is roughly 12–20 Mbps for 1080p60, 20–35 Mbps for 1440p60, and 40–70 Mbps for 4K60, then adjust after examining real footage.
Do not chase a number simply because a creator on a different GPU uses it. Grass, particles, foliage, rapid camera spins, and dark noisy scenes are harder to encode than menus or slow strategy games.
Capture Game Audio, Microphone, and Voice Chat Cleanly
Audio is where many beginners discover that how to record gameplay is more than pressing a red button. Viewers will forgive slightly soft video. They will leave quickly if the game is painfully loud, the microphone clips, or your voice disappears under explosions.
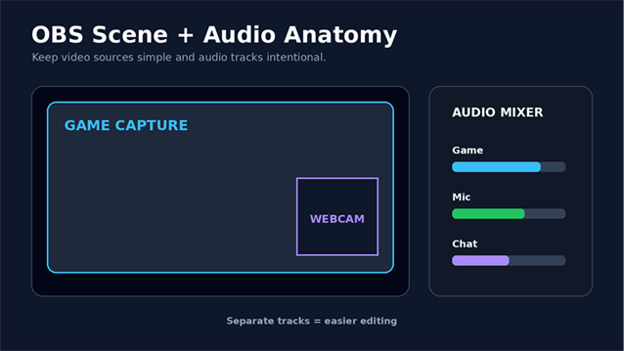
Start with three possible sources: game/system audio, your microphone, and voice chat. If the recorder allows it, keep them on separate tracks. That gives you the ability to lower teammates, mute copyrighted menu music, remove a cough, or boost commentary during editing without damaging everything else.
For a commentary microphone, speak at your real gaming volume and watch the meter. Aim for healthy movement with loud phrases staying below clipping. A useful practical target is for normal speech to sit roughly around -18 to -12 dB with louder peaks approaching -10 to -6 dB. Exact meters vary, so the test clip matters more than the number.
Wear headphones during setup. Speakers can leak game sound back into the microphone, creating an echo that becomes especially obvious after compression.
- Game too loud: Lower the game source in the recorder instead of whispering into the mic.
- Mic sounds thin: Move the mic closer before adding heavy gain.
- Voice chat missing: Confirm the chat app output device matches the device being captured.
- Echo/doubling: Make sure the same app audio is not being captured twice.
| Pro-Tip: Record 10 seconds of silence before you begin talking. Editors can sample the room noise for gentle noise reduction, and you get a clean reference for your microphone floor. |
Configure OBS Studio for Reliable Gameplay Recording
OBS is the tool most readers choose after they understand the basics of how to record gameplay, so it is worth setting it up deliberately rather than copying a random “best settings” screenshot.
- Run the Auto-Configuration Wizard first. It gives you a sensible baseline based on the computer. You can tune from there instead of starting with extreme settings.
- Create a dedicated Recording profile. Name it something obvious such as “1080p60 Recording.” Profiles save output-related settings, while Scene Collections can hold different source layouts.
- Add Game Capture before Display Capture on Windows. Game Capture targets the game and often avoids recording notifications, browser windows, passwords, and other desktop clutter. Use Window Capture or Display Capture only when needed.
- Add your microphone intentionally. Select the actual device, rename it clearly, and disable unused global audio devices if they create duplicates.
- Choose a hardware encoder if your system supports one. Keep the preset moderate at first; a “maximum quality” preset is pointless if it causes the GPU to miss frames while the game is busy.
- Record to MKV for long sessions, then remux to MP4. OBS recommends workflows that can remux recordings, and MKV is safer if the app or PC crashes because an interrupted MP4 can be harder to recover. In OBS, use File → Remux Recordings after the session, or enable automatic remuxing if that fits your workflow.
- Make a 60-second torture test. Load a demanding area, spin the camera quickly, trigger particles, speak into the mic, and open the same overlays you will use during the real session. Review the file at full screen before recording for an hour.
Official reference: OBS Studio recording output guide
OBS Settings by PC Class
Older or entry-level PC: 720p60 or 1080p30, hardware encoder, simple scene, no browser overlays, modest quality preset.
Midrange gaming PC: 1080p60, hardware encoder, quality-based recording, separate mic/game audio, webcam if needed.
High-end PC: 1440p60 or 4K60 if the game remains smooth, AV1 when the editing/upload workflow supports it, and multiple tracks for flexible post-production.
Do not use resolution as a status symbol. The best creator setup is the one that records every session reliably without forcing you to troubleshoot instead of play.
Record Gameplay on Windows with Xbox Game Bar
For a quick Windows workflow, how to record gameplay can be as simple as a keyboard shortcut. First, open Settings → Gaming → Xbox Game Bar and make sure the feature is enabled. Launch the game, then use Windows + Alt + R to start recording.
Use Windows + G if you want the full overlay. The Capture widget gives you recording controls and microphone status. When finished, stop with Windows + Alt + R. Windows stores the MP4 in Videos → Captures.
Before a long session, open Game Bar settings and verify whether system audio, microphone audio, and the desired app are included. Some protected content and certain desktop scenarios are not captured the same way a dedicated screen recorder would handle them.
Official reference: Microsoft Xbox Game Bar recording instructions
Record with NVIDIA App or AMD Software
For NVIDIA users, open the NVIDIA overlay and configure recording quality, microphone behavior, and Instant Replay before the game begins. Instant Replay is useful when you do not want to record the entire session: the software keeps a rolling buffer and lets you save the moment after it happens.
For AMD users, open AMD Software: Adrenalin Edition and use its Record/Media & Capture controls. Select the recording resolution, frame rate, codec, audio device, and save folder. If the recording suddenly stops saving after a driver change, update to the current driver and confirm Windows has an active audio output device.
Either GPU tool is excellent for low-friction capture. Switch to OBS when you need complex layouts, per-app audio, capture cards, or repeatable production scenes.
Official references: NVIDIA App • AMD recording settings
Record Gameplay on PS5, Xbox Series X|S, and Nintendo Switch
Console players can learn how to record gameplay without buying a capture card. The built-in tools are designed for fast highlights and, on PS5 and Xbox, longer manual captures. The limitation is production control: custom scenes, multiple cameras, advanced audio routing, and overlays are much easier through a capture card and PC.
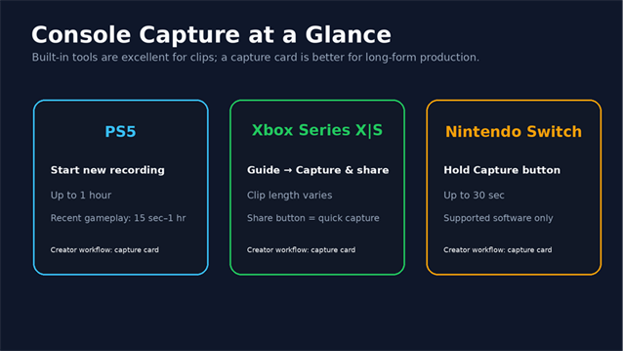
PS5: Press the Create button on the DualSense controller. Choose Start New Recording for a manual recording or Save Recent Gameplay to keep something that already happened. Sony says manual recording can run up to one hour, while recent gameplay can save from the last 15 seconds up to one hour. Capture settings also let you manage video format, resolution, and microphone/voice-chat inclusion.
Xbox Series X|S: Press the Xbox button, open Capture & share, and choose Start recording. The available clip length depends on resolution and storage. The Share button on newer Xbox controllers can also be configured for fast screenshots and clips.
Nintendo Switch / Switch OLED / Switch Lite: Hold the Capture button in a supported game to save up to the previous 30 seconds. This is ideal for a quick highlight, not a full match or long walkthrough. For long-form Switch recording, route HDMI through a compatible capture card into a computer.
Review, Trim, and Export Before You Upload
A recording is not finished when you stop capture. Open the file immediately and check three things: motion, audio, and sync. Scrub to a fast scene to look for dropped frames, listen to a loud moment for clipping, and watch a visible action such as a mouse click or gunshot to make sure audio and video still line up.
Trim dead time at the beginning and end. For tutorials, remove loading screens and repeated attempts unless they add context. Normalize or lightly compress commentary only if needed; aggressive processing can make a cheap headset sound harsher, not better.
Export in the same frame rate as the recording unless you have a deliberate reason to convert it. Avoid repeatedly re-encoding the same file. Keep the original master until the upload is finished and verified.
Common Mistakes to Avoid
Most bad gameplay recordings come from a handful of predictable errors. Fix these before you spend money on hardware.
- 1. Recording at a resolution the PC cannot sustain. A 4K badge does not compensate for skipped frames. Drop to 1440p or 1080p and protect smoothness.
- 2. Never recording a test clip. A 60-second test can catch a muted microphone, wrong audio device, black capture source, or full disk before a one-hour session.
- 3. Capturing every audio source twice. Desktop audio plus per-application audio can produce echo. Use one deliberate path for each sound.
- 4. Filling the system drive. High-quality footage grows fast. Set a dedicated folder and keep a healthy free-space buffer.
- 5. Using one giant mixed audio track for serious editing. Separate the microphone, game, and chat whenever the tool allows it.
Advanced Tips and Next-Level Hacks
Once the basic how to record gameplay workflow is stable, improve efficiency instead of simply increasing bitrate.
Use replay buffers for highlight-heavy games. Rolling capture saves storage because you keep only the moments worth editing.
Create hotkeys you can press without looking. Start/stop, mute mic, save replay, and scene switch should not require leaving the game.
Record separate audio tracks. Keep a combined track for convenience and isolated tracks for editing when your software supports both.
Use AV1 when the full workflow supports it. Modern GPUs can produce excellent quality at lower bitrates, but older editors, devices, or platforms may be easier with H.264 or HEVC.
Treat HDR as a workflow, not a checkbox. HDR capture can look washed out when the game, recorder, editor, export settings, display, and platform do not agree on color space. If you do not specifically need HDR delivery, SDR is easier and more predictable.
Use a second PC only when there is a real bottleneck. A dual-PC setup adds cost, cables, audio routing, and failure points. Modern hardware encoders make single-PC capture sufficient for many creators.
| 💡 Quick Hack: Put recordings on a second SSD if your game constantly streams large assets from the primary drive. This is not mandatory, but it can smooth heavy open-world capture on storage-limited systems. |
| Pro-Tip: Create one “SAFE” OBS profile that you never experiment with. Duplicate it for new codecs, HDR, 4K, or unusual scenes so a failed test never ruins your dependable setup. |
Troubleshooting: Fix Gameplay Recording Problems
If how to record gameplay goes wrong, diagnose the symptom instead of changing random settings. Make one change at a time and repeat the same short test scene so you can tell whether the change helped.
Recording is choppy but the game feels smooth
Check the recorder statistics for rendering or encoding lag. Lower output resolution or frame rate first. Use a hardware encoder. Simplify OBS scenes, especially browser sources, animated overlays, and high-resolution webcams. Cap the game frame rate so the GPU is not pinned at 99–100% with nothing left for compositing and encoding.
The recording shows a black screen
In OBS on Windows, try Game Capture for the game first, then Window Capture if necessary. Run the game and OBS on the same GPU on laptops with hybrid graphics. Some protected or anti-cheat-driven applications require different capture methods.
Game audio is missing
Confirm the game is actually playing through the same Windows output device the recorder expects. In OBS, watch the meter while the game makes sound. If you use per-application capture, disable duplicate global desktop audio and make sure the game process is selected.
Microphone is too quiet or distorted
Move the microphone closer before boosting gain. Disable unnecessary automatic gain controls that pump background noise. If peaks hit the top of the meter, reduce input gain; clipped audio cannot be repaired cleanly later.
Files are enormous
Use a quality-based hardware encoder rather than an excessive constant bitrate. Lower resolution if your delivery platform does not benefit from the current size. Archive finished projects and delete rejected takes only after confirming your final exports.
Audio drifts out of sync
Long sessions can expose device clock or performance problems. Update audio/GPU drivers, avoid unstable USB hubs for critical microphones, keep sample rates consistent where possible, and test another container/encoder. If the drift is gradual, editors can resync a track, but the better fix is preventing it in capture.
AMD recording or replay does not save
Update AMD Software and verify the save folder is writable and has free space. AMD’s 2026 driver notes have included fixes for recording/replay save failures in specific configurations, so current drivers matter. Also verify an audio output device is selected.
HDR recording looks gray or washed out
Confirm the recorder is configured for the same HDR/color space as the game and that the editor understands the footage. If your goal is a normal SDR upload, capture or tone-map to SDR rather than mixing HDR and SDR settings.
Maintenance: Keep Your Recording Setup Reliable
- Create one main Recordings folder with subfolders by game and date. Consistent naming makes editing and backup much faster than searching a cluttered Captures folder.
- Keep at least 15–20% of the recording drive free when possible. SSD performance and application stability can suffer when the drive is nearly full.
- Update GPU drivers deliberately, not five minutes before a tournament or paid recording session. After an update, record a one-minute validation clip.
- Save working OBS profiles and scene collections. If you experiment, duplicate the profile first so you always have a known-good configuration.
- Once a month, review hotkeys, audio devices, save paths, and available storage. Windows updates, driver updates, new headsets, and USB changes can silently reorder devices.
Frequently Asked Questions
What is the easiest way to record gameplay on Windows 11?
Xbox Game Bar is the easiest built-in option. Open the game and press Windows + Alt + R to start or stop. Use OBS Studio when you need more control, multiple audio tracks, overlays, or capture-card input.
What is the best free game recording software?
OBS Studio is the strongest free choice for control and flexibility. Xbox Game Bar is simpler for quick Windows clips, while NVIDIA App and AMD Software are convenient if your GPU supports their capture features.
How do I record gameplay without lag?
Use a hardware encoder, leave GPU/CPU headroom, lower recording resolution or frame rate if needed, and cap the game frame rate when the GPU is fully saturated. Test the most demanding scene rather than a quiet menu.
Should I record gameplay at 30 fps or 60 fps?
Use 60 fps for fast shooters, racing, sports, and action games when your system can sustain it. Use 30 fps for slower games, tutorials, or systems that struggle with 60 fps capture.
Can I record game audio and my microphone separately?
Yes. OBS Studio can record multiple audio tracks, and some other tools offer separate microphone controls. Separate tracks are strongly recommended when you plan to edit commentary, game sound, and voice chat independently.
Do I need a capture card to record console gameplay?
Not for basic clips. PS5, Xbox, and Nintendo Switch have built-in capture features. A capture card is useful for longer sessions, custom overlays, webcam scenes, advanced audio routing, or recording a console directly into OBS on a computer.
Conclusion: Build a Recording Routine You Can Trust
Learning gameplay recording well is mostly about building a reliable routine: choose the simplest recorder that meets the goal, protect game performance, separate important audio, make a short test clip, and review the result before the real session.
Start with 1080p60 and a hardware encoder, then upgrade only the part that is actually limiting you. Better recording comes from fewer surprises, not from maxing every setting.
editor's pick
latest video
news via inbox
Nulla turp dis cursus. Integer liberos euismod pretium faucibua