How to Back Up Your Phone: Easy Guide to Protect Your Photos, Contacts & Data
A lost, stolen, water-damaged, or suddenly dead phone can turn years of photos, messages, contacts, and app data into a recovery emergency. The good news is that learning how to back up your phone is easier than most people think, and the safest setup does not require expensive software.
This guide walks through iPhone, Android, Samsung, cloud, computer, photo, and app-specific backup methods. You will also learn what a phone backup does not save, how to verify that a backup actually finished, how to build a second safety copy, and what to check before you erase, trade in, repair, or replace a device.
Quick Answer: What Is the Best Way to Back Up a Phone?
Essential Tools & Materials Breakdown
You can complete a reliable backup with hardware you probably already own. The most important “tool” is not a cable or an app; it is a backup method that you understand well enough to verify and restore.
| Tool or requirement | Best for | Estimated cost | Skill level | What to check |
| Stable Wi-Fi connection | iCloud, Google One, Google Photos | $0 with existing internet | Beginner | Avoid weak hotel or guest Wi-Fi for the first large backup. |
| Apple Account or Google Account | Cloud backup and restore | $0 | Beginner | Confirm you know the password and recovery method. |
| Phone charger | Long first-time cloud backups | $0-$30 | Beginner | Keep the phone powered during large uploads. |
| USB / USB-C data cable | Computer backup and file transfer | $0-$20 | Beginner | A charge-only cable may not transfer data. |
| Mac or Windows PC | Local phone backup | Existing hardware | Beginner-Intermediate | Make sure the computer has enough free storage. |
| External SSD or hard drive | Second local copy | $40-$120+ | Beginner | Optional, but useful for irreplaceable photos and archived backups. |
| Google Photos or iCloud Photos | Photo/video protection | Free tier or paid storage | Beginner | Photo syncing and device backup are related but separate settings. |
| Samsung Smart Switch | Samsung local backup and transfer | $0 | Beginner | Install the current official version on the PC or Mac. |
| Password manager | Backup-account recovery | Free or paid | Beginner | Store account passwords and encrypted-backup passwords safely. |
| Screen lock PIN/password | Backup encryption and account protection | $0 | Beginner | Use a real PIN, pattern, or password rather than no lock. |
| Best starting setup: automatic cloud backup + automatic photo backup + one recent computer copy before anything risky. That combination protects against the most common failures without turning backup into a full-time hobby. |
| 💡 Quick Hack: Before buying extra storage, look at what is consuming space. Old device backups, duplicate videos, offline downloads, and unnecessary app data can be larger than the information you actually care about. |
Before You Start: Decide What Actually Needs Protection
Before deciding how to back up your phone, make a two-minute inventory. A phone contains several different classes of data, and no single “Back Up Now” button necessarily handles every one of them in the same way.
Separate backup from sync
This is the concept that prevents the most unpleasant surprises. A backup is a recovery copy. Sync keeps information consistent across devices and a cloud service.
For example, iCloud Photos and Google Photos can make pictures available across devices, but deleting a synced item may also affect what you see elsewhere after the service processes the deletion. That is why extremely important photos, scanned documents, or business files deserve an additional copy on a computer or external drive.
Make a five-minute data audit
Check these categories before you start:
- Photos and videos: usually the largest and most emotionally valuable category.
- Contacts and calendars: often synced to Google, iCloud, Microsoft, or an employer account.
- Messages: SMS/MMS, iMessage, RCS, and messaging apps can use different backup systems.
- App data: some apps restore from the phone backup; others require their own login or export.
- Documents and downloads: files saved manually to the phone may live outside normal photo backup.
- Authenticator apps: some support cloud sync; others need an export, transfer, or recovery code.
- Passwords and passkeys: usually managed by iCloud Keychain, Google Password Manager, or a third-party manager.
- Health and activity data: particularly important for iPhone users making a local computer backup.
- eSIM and carrier information: a backup does not guarantee automatic mobile-service reactivation.
Confirm you can recover the account that holds the backup
A perfect cloud backup is useless if you cannot sign in after the phone is gone. Before a trip, repair, trade-in, or factory reset, confirm that your Apple Account or Google Account recovery phone number and email address are current.
If you use a third-party password manager, the MyFlexBots guide to protect your backup account passwords is a useful companion step.
| Pro-Tip: Write down or securely store any encrypted local-backup password separately from the computer that holds the backup. An encrypted backup password that exists only inside the lost laptop is not much of a recovery plan. |
Method 1: Back Up an iPhone to iCloud
For most iPhone owners, the simplest answer to how to back up your phone is iCloud Backup. It is built into iOS, can run automatically, and can restore settings and supported device data when you set up a replacement iPhone.
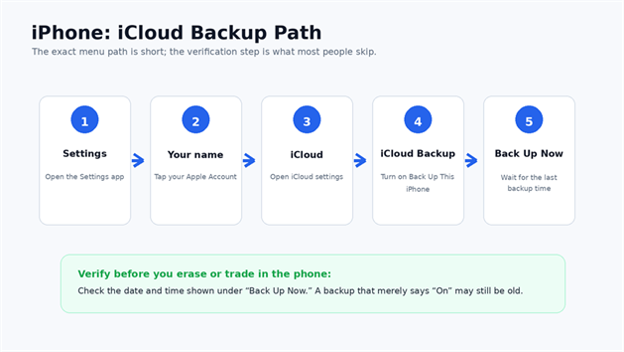
Apple’s current instructions say a manual iCloud backup starts from Settings > [your name] > iCloud > iCloud Backup > Back Up Now. You can review the official steps in Apple’s official iCloud backup instructions.
Connect to a dependable network
Connect the iPhone to Wi-Fi for the initial backup. A first backup can be large, especially if many app files or messages are included.
If you are about to leave home, do not start a huge first backup on weak airport or hotel Wi-Fi and assume it will finish. Give the phone enough time to complete and verify the timestamp.
Open iCloud Backup
- Open Settings.
- Tap your name at the top.
- Tap iCloud.
- Tap iCloud Backup.
- Turn on Back Up This iPhone if it is off.
When automatic iCloud Backup is enabled, Apple says the iPhone can back up automatically when it is connected to power, locked, and connected to Wi-Fi. Some supported 5G setups may also offer cellular backup depending on carrier options.
Run a manual backup before a risky event
Tap Back Up Now and leave the phone connected until the process finishes. A manual backup is worth doing immediately before:
- selling or trading in the phone;
- sending it for repair;
- installing a major iOS update when you have critical data;
- international travel;
- moving to a new iPhone;
- factory resetting to troubleshoot a serious problem.
Verify the last backup date and time
Do not stop at seeing that the backup switch is “On.” Look for the last successful backup date and time shown under the backup controls.
If the timestamp is old, you do not yet have the fresh recovery point you think you have.
Understand what iCloud Backup is not
Apple explains that an iCloud backup mainly covers information and settings that are not already syncing to iCloud. Data already synchronized through services such as iCloud Photos, iCloud Contacts, or Messages in iCloud can be handled separately from the device-backup package.
That distinction matters when calculating storage and when troubleshooting “missing” items. Something can be absent from the backup file because it is expected to re-sync after sign-in.
| 💡 Quick Hack: If iCloud says there is not enough space, check the next backup size and review which apps are contributing large amounts of data before immediately upgrading storage. A game, offline media app, or cache-heavy app may not need to be part of the device backup. |
Method 2: Make an Encrypted iPhone Backup on a Mac or Windows PC
Cloud backup is convenient, but a local computer backup gives you another recovery path. It is especially valuable before a repair, a beta-software experiment, an extended trip, or a phone migration when the internet is slow.
If you are choosing how to back up your phone for maximum resilience, use iCloud for automatic protection and make an encrypted computer backup periodically.
On a Mac
On macOS Catalina or later:
- Connect the iPhone with a trusted USB or USB-C cable.
- Open Finder.
- Select the iPhone in the Finder sidebar.
- Open the General tab.
- Choose the option to back up the iPhone’s data to the Mac.
- Enable Encrypt local backup if you want the more complete encrypted backup.
- Create a strong backup password and store it safely.
- Click Back Up Now.
- Wait until Finder shows a recent backup time.
Apple notes that encryption is needed if you want local backups to include certain sensitive data such as saved passwords, Wi-Fi settings, Health data, and related protected information.
On Windows
Apple’s current Windows workflow uses the Apple Devices app when available, with iTunes retained for older setups that do not have the newer app.
- Install or open Apple Devices on the PC.
- Connect the iPhone and tap Trust if the phone asks.
- Select the iPhone in the app sidebar.
- Open General.
- Choose to back up the phone to the computer.
- Select Encrypt local backup if you want an encrypted backup.
- Save the encryption password somewhere secure.
- Click Back Up Now.
- Use Manage Backups afterward to confirm the backup exists.
For the current Windows procedure, Apple provides a dedicated Windows iPhone backup guide.
Should you encrypt the local backup?
In most cases, yes. Encryption protects the backup file on the computer and allows additional sensitive categories to be included. The tradeoff is simple but serious: if you forget the encrypted-backup password, you may not be able to use that backup.
| Pro-Tip: Treat the encrypted-backup password like a safe key. Put it in a password manager, a sealed recovery note, or another secure location you can reach without the phone being backed up. |
Method 3: Back Up an Android Phone with Google
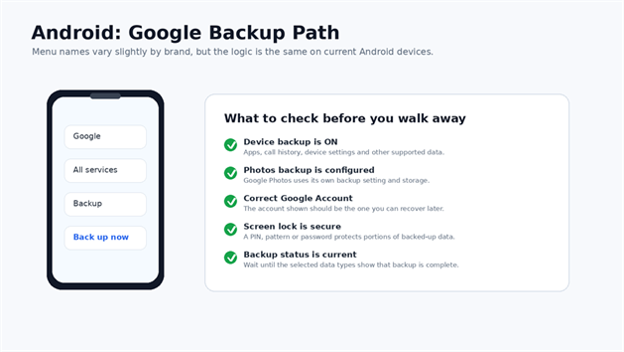
On most modern Android phones, Google’s device backup is the default starting point. Menu labels vary by manufacturer and Android version, but the current Google path is generally Settings > Google > All services > Backup, followed by Backup now for a manual run.
That makes Google’s built-in service the easiest choice for many people researching how to back up your phone on Android. See Google’s Android backup guide for the latest official menu wording.
Confirm the backup account
Open the backup settings and verify which Google Account is receiving the device backup. This is especially important if the phone has separate personal, work, school, or old Gmail accounts.
Choose an account you control long term and whose recovery options are up to date.
Turn on device backup
If the phone asks you to enable backup through Google One, follow the prompts. Google’s documentation says the backup can include supported device data such as apps, call history, contacts, device settings, and SMS/MMS, although exact coverage can vary by device and Android version.
Use a PIN, pattern, or password screen lock. Google specifically recommends a real screen lock to help protect backed-up data.
Run “Back up now”
Tap Back up now before replacing, repairing, resetting, or migrating the phone. A large backup may not complete immediately; Google notes that device backup can take time to finish.
Keep the phone online and avoid aggressive battery-saving modes if they are interrupting uploads.
Check the backup details
Review the listed backup categories and look for a current status. Do not assume a single green switch means every category is current.
If one data type shows an old time or an error, fix that category before wiping the device.
Treat photos and videos as a separate job
Google Photos has its own backup controls. Open Google Photos, tap the profile image, open Photos settings > Backup, and verify:
- backup is turned on;
- the correct Google Account is selected;
- the chosen backup quality fits your needs;
- device folders you care about are included;
- the app shows Backup complete before you erase the phone.
Google explains that Google Account storage is shared across products such as Gmail, Drive, and Photos, so a full account can stop new photo uploads. You can review the current photo guidance in Google Photos backup help.
| 💡 Quick Hack: On Android, check “Back up device folders” in Google Photos. Screenshots, messaging-app images, edited pictures, or camera folders created by third-party apps may live outside the main camera folder and can be missed if you only back up the default location. |
Method 4: Back Up a Samsung Galaxy with Smart Switch
Samsung owners have an extra option: Smart Switch. It is useful for moving to another Galaxy phone and for creating a computer-based copy of supported data.
Samsung’s current support guidance says Smart Switch can create smartphone backups on a PC or Mac and restore that data to a Samsung phone. The official Samsung Smart Switch backup guide covers the desktop workflow.
A typical computer backup looks like this:
- Install Smart Switch from Samsung’s official source.
- Connect the Galaxy phone with a data-capable USB cable.
- Unlock the phone and approve connection prompts.
- Open Smart Switch on the computer.
- Choose Backup.
- Review the categories available for backup.
- Start the backup and leave the cable connected.
- Confirm the completion message before disconnecting.
Smart Switch is best viewed as a second layer, not a reason to turn off Google backup. Keeping both systems available gives you more flexibility during a phone replacement.
Method 5: Protect Photos and Videos Separately
For many people, photos are the one category that cannot be recreated. A missed app setting can be annoying; a lost photo of a wedding, newborn, trip, construction project, medical record, or signed document may be permanent.
That is why a serious plan for how to back up your phone should treat photos and videos as their own backup project.
Option A: Use the phone ecosystem’s photo service
On iPhone, iCloud Photos can sync your photo library across Apple devices when enabled. On Android or iPhone, Google Photos can automatically upload photos and videos to a Google Account.
Whichever service you use, verify the status, not merely the switch. Open the photo app and confirm that there are no items waiting to upload.
Option B: Copy irreplaceable media to a computer
Every few months—or before a major life event—copy your most important albums to a computer. For Android, normal USB file transfer often makes this straightforward. For iPhone, import through Photos, File Explorer/Apple tools, or another supported workflow.
Then, if the photos are genuinely irreplaceable, copy that folder to an external SSD or hard drive.
Option C: Keep originals for professional work
If you shoot RAW photos, 4K/8K video, ProRes, large drone clips, or client media, check the cloud service’s quality setting and storage behavior. Compression can be useful for everyday family photos but may be wrong for production masters.
| Pro-Tip: Do not delete a large batch of photos from the phone immediately after seeing them on a cloud website. First check several old and recent files from another device, confirm full-resolution availability if that matters, then make your storage cleanup decision. |
Method 6: Make a Local Copy to a Computer or External Drive
A local copy protects you against problems that cloud-only users often forget: account lockout, storage expiration, a failed sync, accidental deletion, internet outages, or a service-side problem.
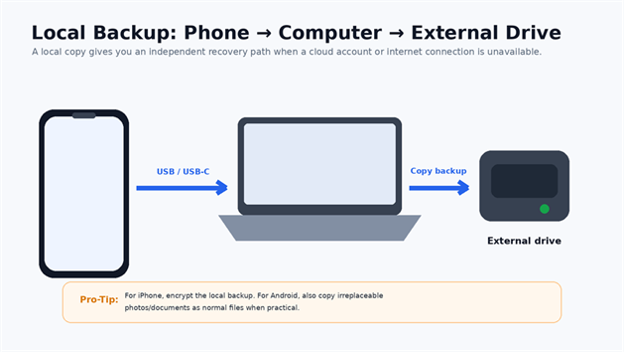
For Android, connect the phone to a trusted computer, choose the appropriate file-transfer mode, and copy important folders such as DCIM, Pictures, Movies, Download, and project folders you recognize. Do not blindly copy random system directories you do not understand.
For iPhone, use Finder on Mac or Apple Devices on Windows for a proper device backup. You can also separately import photos and videos when you want a normal folder of media files that can be opened without restoring a phone backup.
If you regularly use the phone with a PC, the MyFlexBots guide on how to mirror your phone to a PC can help build a more efficient desktop workflow for phone-heavy tasks.
| 💡 Quick Hack: Label one USB cable as your “data cable.” Many cheap cables charge perfectly but cannot transfer data reliably. Keeping one known-good cable prevents hours of unnecessary driver troubleshooting. |
Method 7: Back Up App-Specific Data That Phone Backups Can Miss
Learning how to back up your phone properly also means checking app-specific data. A device backup is not a magical image of every app server and every login. Some apps intentionally keep data in their own cloud account; some exclude data from device backups; some require a separate transfer or export.
Pay special attention to these categories:
Messaging apps
WhatsApp, Signal, Telegram, and other messaging apps use different storage models. Before changing phones, open the app’s own backup or transfer settings and read what is included.
Do not assume that seeing the app icon after restore means years of chat history will automatically appear.
Authenticator apps
Two-factor authentication apps can become a major recovery blocker. Depending on the app, you may need cloud sync, an export/transfer process, or recovery codes.
Before resetting the old phone, prove that you can sign in to your most important accounts from another device.
Banking and government apps
Secure apps often require fresh device registration after a restore. Their local app data may not migrate by design.
Make sure you know the username, customer ID, recovery method, and any required phone number before erasing the old device.
Notes, voice recordings, and downloaded files
Check where each app stores its content. A note saved to an iCloud or Google account is different from a note stored “On My iPhone” or locally inside an app. Voice recorders and file managers can also keep local-only content.
Work profiles and managed devices
Company-managed phones can have restrictions that change what can be backed up. If a device belongs to an employer, follow the organization’s IT policy rather than trying to bypass management controls.
Five Common Backup Mistakes to Avoid
Even after someone learns how to back up your phone, these five mistakes can still turn a “successful” backup into a bad recovery day.
1. Erasing the old phone before testing the new one
A transfer screen saying “complete” does not prove that every important app, photo, message, and authenticator works.
Prevent it: Keep the old phone charged and untouched until the new phone passes a real checklist: calls, texts, contacts, photos, notes, password access, authenticator codes, banking apps, and key documents.
2. Confusing sync with an independent backup
If a deletion is synchronized, the cloud copy may not remain a permanent archive.
Prevent it: Keep a separate computer or external-drive copy of irreplaceable files.
3. Backing up to the wrong account
Multi-account phones are common. Users discover too late that the backup went to an old Gmail address or an Apple Account they can no longer access.
Prevent it: Read the account email shown inside backup settings before starting the final backup.
4. Forgetting the encrypted-backup password
An encrypted local iPhone backup can be excellent protection, but the password is part of the recovery system.
Prevent it: Save the password in a trusted password manager or secure recovery record.
5. Trusting an old backup timestamp
Automatic backup can silently stop because storage is full, Wi-Fi is unavailable, battery rules interfere, or a setting changed.
Prevent it: Before any high-risk event, manually run a backup and verify the fresh date/time.
Advanced Tips and Next-Level Backup Hacks
Once the basics work, the best improvement is not “more apps.” It is reducing the chance that one failure can destroy every copy.
Use a mobile-friendly 3-2-1 strategy
A traditional 3-2-1 backup rule means three copies of important data, on two types of storage, with one copy off-site. You can adapt that idea to a phone without creating an IT department at home.
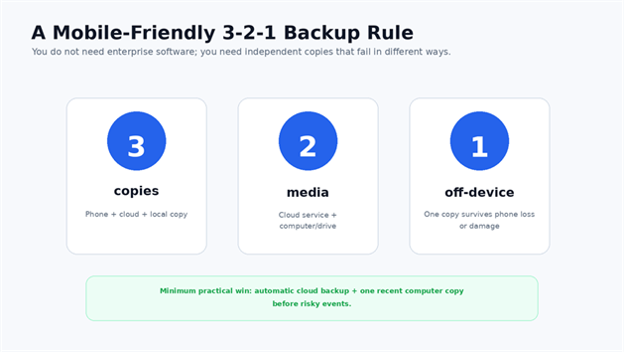
A practical version looks like this:
- Copy 1: the working data on the phone.
- Copy 2: automatic cloud backup and photo storage.
- Copy 3: a recent computer or external-drive copy of irreplaceable files.
The cloud copy is already off-device, so losing the phone does not destroy everything. The local copy protects you if the cloud account becomes unavailable or a sync mistake affects cloud content.
Schedule backups around risk, not just the calendar
Monthly reminders are useful, but event-based backups are more important. Run a fresh manual backup before:
- a phone repair;
- international travel;
- a factory reset;
- joining an OS beta;
- a major system update when the phone holds critical work;
- selling or trading in the device;
- moving eSIMs or changing carriers;
- a long photo/video shoot;
- handing the phone to a child for a trip or event.
Test a restore path without wiping your phone
You do not need to factory reset every month. Instead, test the pieces you can verify safely:
- sign in to the cloud account from a computer;
- open recent and old photos from another device;
- check that contacts appear on the web or another synced device;
- confirm the computer shows a recent local backup;
- confirm the encrypted-backup password is stored;
- open several manually copied files from the external drive.
Keep recovery information outside the phone
If the phone is your password manager, authenticator, recovery email, and only trusted device, losing it can create a circular recovery problem.
Store critical recovery codes and account recovery information in a secure location that does not depend entirely on the same phone.
| 💡 Quick Hack: Before a factory reset, take a screenshot or photo of the backup-status page showing the successful date and time, then save that proof to your computer. It gives you a quick reference if you later wonder which account or backup you used. |
Troubleshooting: What to Do When Phone Backup Fails
Problems often happen at the worst possible time. The fastest way to troubleshoot how to back up your phone is to identify whether the failure is caused by storage, network, account access, power management, a cable, or one specific data category.
iCloud says there is not enough storage
First check how much storage is available and compare it with the next backup size. Apple recommends reviewing device backups and the apps contributing to them.
Try this order:
- Delete obsolete backups from devices you no longer use.
- Review large apps included in the backup.
- Remove data that is safely stored elsewhere and truly unnecessary.
- Confirm photos are not being duplicated in another workflow you do not need.
- Upgrade iCloud storage only if the remaining data genuinely needs the space.
Apple’s iCloud backup troubleshooting page covers common storage and Wi-Fi errors.
Android backup is stuck or never finishes
Work through the basics before resetting anything:
- connect to stable Wi-Fi;
- connect the phone to power;
- confirm the correct Google Account;
- check available Google Account storage;
- update Google Play services and relevant Google apps;
- turn off extreme battery-saver modes temporarily;
- restart the phone;
- run Back up now again;
- inspect the backup details to find the category that is failing.
Google notes that a device backup can take time, so a large first backup may not finish instantly.
Google Photos says backup is paused
Open Google Photos and tap the profile image to read the status message. Common causes include no network, battery restrictions, full Google storage, a wrong account, or mobile-data settings.
Also check Back up device folders if only screenshots or messaging-app pictures are missing.
The computer does not recognize the phone
Do not start by reinstalling the operating system. Check the physical layer first:
- Unlock the phone.
- Try a known-good data cable.
- Try another USB port directly on the computer.
- Approve Trust This Computer or the Android USB prompt.
- On Android, choose file transfer if you need file access.
- Update Apple Devices, Smart Switch, or required device drivers.
- Restart both devices if detection remains inconsistent.
A charge-only cable is one of the most common causes of “nothing happens” problems.
The backup is much larger than expected
Large message attachments, offline maps, downloaded streaming media, video-editing caches, and app documents can inflate a backup.
Review the biggest contributors before paying for a larger plan. But do not exclude an app just because it is large; first determine whether its data is already safely stored elsewhere.
Restored photos are missing
Check whether the photos were expected to come from the device backup or from a separate photo-sync service. Then verify the account, photo-backup settings, archived/trash folders, and device folders.
On Google Photos, you can also check the backup status of individual items and confirm which account is active.
The new phone restored apps but not app data
This can be normal. Some apps store almost everything on their own servers and simply require a login. Others intentionally block restoration of sensitive local data.
Open the app, sign in to the correct account, and look for its own restore, import, or transfer option.
Long-Term Backup Maintenance Checklist
A reliable answer to how to back up your phone includes maintenance, not just a one-time setup. A backup system is useful only while it continues to run, so use this simple maintenance rhythm:
Every month
- Check the last cloud-backup date.
- Open the photo app and confirm backup is complete.
- Make sure the cloud account is not nearly full.
- Verify that account recovery email/phone details are current.
Every three to six months
- Make a fresh computer backup or copy irreplaceable media to a computer.
- Copy the most important archive to an external drive.
- Open a handful of files from the external drive to confirm it is readable.
- Review old device backups and remove obsolete ones carefully.
Before any major risk event
- Run a manual cloud backup.
- Verify the timestamp.
- Confirm photo backup is complete.
- Make a local copy if the data is important.
- Confirm authenticator and banking recovery methods.
- Keep the old phone until the new or repaired phone is fully verified.
| Pro-Tip: Set a recurring calendar reminder called “Phone backup check” every 90 days. The task should take about ten minutes once the system is established, and it is far cheaper than professional data recovery. |
Frequently Asked Questions
How often should I back up my phone?
Automatic cloud backup should stay enabled continuously. In addition, run a manual backup before repair, resale, travel, a factory reset, or a major system change. For important photos and documents, make a second local copy every one to three months or after a major event.
Does a phone backup include all photos and videos?
Not always in the way people expect. Photos may be handled by iCloud Photos or Google Photos rather than stored inside the device-backup package. Verify the photo service separately and check that its status says the upload is complete.
Can I back up a phone without paying for cloud storage?
If you are learning how to back up your phone on a budget, yes. You can use the included free storage up to its limits, make a local computer backup, or manually copy files to a computer or external drive. The best free approach depends on how much photo/video data you have and whether you need full-device restore convenience.
Is iCloud Backup better than a computer backup?
They solve slightly different problems. iCloud is automatic and convenient away from home. A computer backup gives you an independent local recovery path and does not depend on cloud capacity at restore time. For important data, using both is stronger than choosing only one.
What should I do before trading in or factory-resetting a phone?
Run a manual backup, verify the successful date and time, confirm photo backup is complete, check app-specific transfers such as authenticators and messaging apps, and test the new phone if you already have it. Only erase the old phone after you can prove the replacement contains what you need.
Can I restore an Android backup to any Android phone?
Not always. Restore behavior varies by manufacturer and Android version, and Google warns that you generally cannot restore a backup from a newer Android version onto a phone running an older Android version. App compatibility can also affect what returns.
Conclusion: Make Backup Boring Before You Need It
The best backup system is the one that works quietly in the background and gives you a second path when something fails. Once you know how to back up your phone, keep automatic cloud backup enabled, verify photos separately, create a recent local copy before risky events, and never erase the old device until the replacement is proven.
editor's pick
latest video
news via inbox
Nulla turp dis cursus. Integer liberos euismod pretium faucibua